Since Backlight was introduced, once in a while users asked for more advanced form features such as radio buttons and drop-down lists. Backlight’s contact form editor is easy to use, but only supports text input. These forms are really just intended for simple contact forms. For more advanced forms, it is recommended to use WordPress plugins.
A while ago in the The Turning Gate forum, user Rico posted an interesting approach/idea. After some back and forth, a phplugins based solution was found.
The idea is to add radio buttons or drop down list elements to an existing form using javascript. Whenever an element is selected, a result field is updated. Once the form is submitted, the result field is included and provides the information the user selected.
Here you can see the two options and how they work:
So whenever a selection is done, the corresponding result field (selection) is updated. In the form the user sees, the result field is hidden. Curious? Have a look at my demonstration.
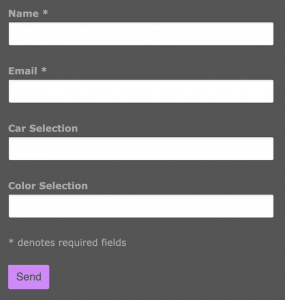
First we start to add our results field to the form. Once done, the form looks something like this:
Next we have to look at the source code to find how these fields are named:
<div id="form" class="div-backlight-form contact-form">
   <form method="post" action="/demo_form" class="backlight-form">
      <p class="contact-email"><label for="name">Name *</label><input type="text" id="name" name="name" value=""/></p>
      <p class="contact-name"><label for="email">Email *</label><input type="text" id="email" name="email" value=""/></p>
      <p class="contact-address"><label for="address">Address *</label><input type="text" id="address" name="address" value=""/></p>
      <p class="contact-field_6"><label for="field_6">Car Selection</label><input type="text" id="field_6" name="field_6" value=""/></p>
      <p class="contact-field_5"><label for="field_5">Color Selection</label><input type="text" id="field_5" name="field_5" value=""/></p>
      <p class="denotes-required-fields">* denotes required fields</p>
      <div class="actions"><input type="submit" name="submit" value="Send"/></div>
   </form>
</div>
In my case “Color Selection” is field_5 and “Car Selection” is field_6. Now we use some javascript magic to introduce our new form elements like the radio buttons and the drop-down list. Following lines show the principle. First we add our custom code before our result field. Then we hide the result field and add a function to update the result field:
echo '<script>
   $("input[name=field_5]").before( here goes my custom code );
   $("input[name=field_5]").hide();
   function updateField(arg){console.log(arg);document.getElementsByName("field_5")[0].value=arg;}
</script>';
Maybe one day I’ll write a function for this skeleton code to make it easier to use. You can motivate me by adding some funds to my Pizza&Wine Fund (see left column for the Donation button). Thanks! But for now, this is how I create the radio buttons and the pull-down list:
// function to add the radio button and pull-down list to my demo_form page
function dlp_formpage_demo_form() {
   echo '<script>
   // Add radio selectors
      $("input[name=field_5]").before(\'<br><input type="radio" name="color" value="red" onclick="updateColor(this.value)"> Red<br><input type="radio" name="color" value="green" onclick="updateColor(this.value)"> Green<br><input type="radio" name="color" value="blue" onclick="updateColor(this.value)"> Blue\');
      $("input[name=field_5]").hide();
      function updateColor(arg){console.log(arg);document.getElementsByName("field_5")[0].value=arg;}

      // Add drop-down list
  $("input[name=field_6]").before(\'<br><select name="cars" onchange="updateCar(this.value)"><option value="none" >Select car</option><option value="chevy" >Chevy</option><option value="chrysler" >Chrysler</option><option value="ford" >Ford</option><option value="tesla" >Tesla</option></select>\');
        $("input[name=field_6]").hide();
   function updateCar(car){document.getElementsByName("field_6")[0].value=car;}
</script>';
}
As you might have noticed, I put this code inside a function. This way, my phplugins file stays prettier for a bit longer. The only thing missing are following few lines of code:
function dlp_page_match($page) {
   if (substr($_SERVER["REQUEST_URI"], 0, strlen($page)) == $page) {
      return 1;
   }  else {
      return 0;
   }
}

function scripts(){
   if ( $this->dlp_page_match('/demo-form') ) {
      $this->dlp_formpage_demo_form();
   }
}
First is my handy page match function called dlp_page_match() and then the phplugins script function where I introduce my code for my lab.danielleu.com/demo-form page. This way, this specific code is only used on the desired form.
Once all is complete, the form looks as follows:
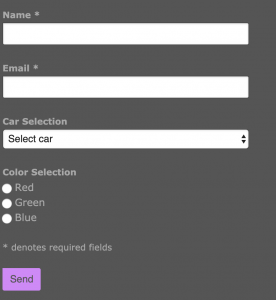
And this is the content of the email I receive:
Name: Daniel Leu
Email: xxxx
Car Selection: tesla
Color Selection: blue
Isn’t it cool that now I can have a predefined selections available to ask my client a few more details, if necessary?
You can use the same principle with the cart checkout forms. I’ll show you how in another post.
Did you like this post? Did you use the given code? Please consider supporting me by buying me a coffee!

Thanks!